Showing posts with label OUGD202 - Tutorials. Show all posts

Wednesday, 26 January 2011

Cameras and 3D in After Effects


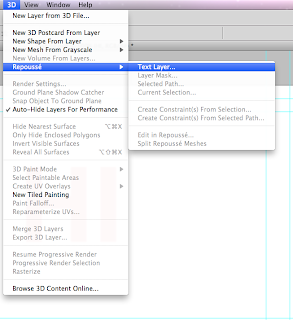
After creating a Film&Video file in Photoshop, I then typed the word 'Hi' and went into:
3D - Repouse - Text Layer...

Once you have made your text 3D you can then edit the settings such as the depth of the 3D effect. 


Once you have made the text how you want it in Photoshop, you then save it as a photoshop file and import it into After Effects.
 Once it is in After Effects you have 4 sections. In the 'controller' section you can edit how you rotate around the word, setting key points as you move it around.
 Then there is the camera section, this is where you can move the camera around your 3d image/text using 'position' x,y,and z rotation.


Wednesday, 19 January 2011

Audio in After Effects.

File Formats: Aiff, WAV, mp3

If it isn't one of these formats use 'Switch' to convert it.

File - Import - Choose File - Footage.

Audio acts just like an image/ text in that it creates its own layer.
The main difference is unlike an image it has a fixed length and will only last for that long.

This can be moved where you want it along the timeline.

You can have as many pieces of audio as you'd like and also adjust the volume and fade a sound out using:

Audio - Audio levels - Adjust the dB whilst adding key frames at different times. Getting louder and louder at each key point or quieter and quieter.


You can also use the Waveform underneath to see when a noise is made along the timeline. This would help if you wanted to sync the noise to an animation.

Also to chose one section of the audio you can just trim it by using the arrows at the end of the bar on the timeline. For example underneath there it shows that the section highlighted is the only section that has sound.


Also When saving to add your type to your animation you MUST tick the audio output button!


-

If you have designed something in After Effects then decide later on that you would like to swap it for. 
Firstly make the file the same size
Select the layer at the bottom left
Hold down ALT
drag the 'asset' or different piece of artwork onto the selected layer

Then you will keep all the key frames and work you had made just changed the layer to your new design. 

Parent/Child Relationship. 


It is a lot like grouping.  If you have say 15 layers and you want them all to do the same thing altogether you can go to the 'Parent' column select all layers but the one you want to be the parent, then click 'none' and chose which layer you want to be the parent, they will all change from 'none' to the name of the layer. Then you only need to edit the 'Parent' layer and all the other layers will do the same functions. 

Except opacity. 

For example if you were to make a car. You would need all layers to move forward but and the same time you would want the wheels to go around. So the shape of the car would be the 'Parent' and the wheels would be individual by spinning but follow in direction. 

Also...

If you were to make a car and wanted the design to follow the path rather than just stay horizontal to the path go to: 

Layer - Transform - Auto Orient


Nesting


Nesting is when you have created an animation with multiple different layers, then you open a new composition then down the left hand side drag the number composition down into the left hand corner. This will then merge the layers and features of that composition and make it one layer in your new composition. However it will not flatten anything so once it is in a new composition you can still edit the features of that layer.

Layer - Pre.compose

That will turn a composition from being multiple layers to one layer of which you can still edit
Monday, 10 January 2011


Using key points and adding the text as the animation plays allows you to add things to the composition at different times.
Making A Path


Making a path. Using the pen tool to draw out a path of which I would like the text to follow then setting the type path to follow it. Also using the key points to time the text travelling along the path through the animation.

Saturday, 8 January 2011

Wednesday, 22 December 2010

After Effects - Photoshop Files

When opening a document in Photoshop you need to:


And then save as a psd. 

---

Importing Type.

Type out your word
Crop it
Delete the background layer
Ensure the layer box is ticked
& Save as a Photoshop file.

---

When importing into After Effects:

File
Import


Footage: used for flat images
Composition Retain Layers: used for words & images with multiple layers.

Photoshop:

To split a word into different sections and also put the different sections onto different layers: 

File
Word
Type Rasterise

then..

Layer
Via Cut

then..

Import the type into After Effects as a Composition Retain Layers.

After Effects - the beginning.


When i first opened after effects i was lost!
So many panels, and different sections.


Project - down the left hand side.
This is where all your files are.


The Timeline - along the bottom. 


Composition
This is where your design is shown in the centre.


HDTV 1080 29.97


Theres also the timecode on there to allow you to change the length of your clip. Our frame will have to be 5 seconds.


Key Frames: These are the points at which changes happen such as moving things around or changing form or colour. You can have more than one at a time going for several different things.


Useful keyboard shortcuts:


~ expand active panel (active panel the one highlighted in yellow that you are working on)
P select layer & press 'P' shows position properties
A select layer and shows the anchor property
R select layer - rotation
T select layer - opacity properties
S select layer - scaler properties
O end of layers time frame
I beginning of layers time frame
U shows all modifications on the layer
UU reveals all modified properties
B beginning work area sets them
N end work area sets them


When creating an animation you will want to keep going back and making sure it looks how you want it to. To do this there is a playback menu at the right hand side:


How to export your animation Quicktimee into Vimeo & onto blog:


Composition - Add to Render Queue


Render Settings:


Time span: Length of Comp.


Lossless: Output Module
Format: Quicktime
Video Codec H.264

Output to: Save!

RENDER!